First of all I want to give a big welcome to everyone who is following along on with me as we navigate our way through the Celestial syllabus for my upcoming Ocean Yachtmaster exam.
To ensure you don’t miss a post, you can add your email address to follow the blog on the right hand side of the website page if you are on a computer (and I think its at the bottom if you are on a phone) I will also put the posts up on our Astrolabe Sailing Facebook page and links on the Women Who Sail group as well. I am hoping to get through it all in the next couple of weeks.
I am not a big fan of maths, so I have been procrastinating about doing this part of the course for some time now. Please feel free to comment in the section below if you have any extra knowledge or experience to share with everyone. Or if you still have any questions and then I can go back and do some more research. Your contribution will be really helpful.
So – lets get started – The Sextant.
How do I choose a Sextant?
I have got a plastic sextant which was given to me by my dear friend Ivan Atkinson. It is a Davis Mark 25 Deluxe Sextant Navigation Tool. You can buy them on Amazon for about USD$160.00 ish.
Plastic sextants are reasonably priced, light weight, and great for beginners or as an emergency back up navigation tool. Being light weight means they can be easier to hold for longer periods. However being plastic they are sensitive to heat and can produce errors if left out in the hot sun due to the frame expanding.
Metal sextants are beautiful instruments. They can be considerably more expensive but produce a more reliable reading as they aren’t so prone to temperature changes. They usually have better mirrors and optics as well. Being heavier they can be more difficult to hold for long periods, but can be more stable in windy or rough conditions.
Rona one of my blog readers suggests “If you can get a heavier sextant like a Plath, do. The extra weight has inertia which makes it more stable. My first transocean with two Davis sextants resulted in me combining parts of each to make one not-very-accurate sextant.”
Whichever type you decide to buy, make sure it has a strong waterproof case, keep it clean and stowed away from anything hot and protected from salt and being thrown around.
 A sextant gets it’s name from the arc at the bottom which is one sixth of a circle.
Getting to Know your Sextant
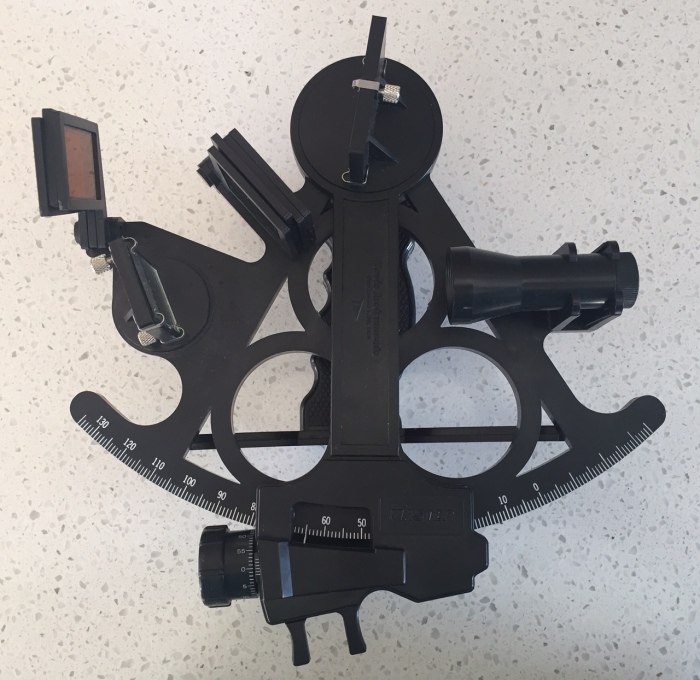
Do you have a sextant? If so, get it out of the box and have a good look at it. But before you to – make sure you only handle it by the frame and the handle at the back. All sextants are right handed so carefully remove it from the box with your left hand on the frame and then transfer it to your right hand holding the handle at the back.
If you have got a lanyard – then put that around your neck. Just a small impact can ruin your sextant forever.

First of all lets have a look at the two mirrors. The lower one on the left hand side is fixed in one place and is called the horizon mirror, it has a clear side and a mirrored side.
The mirror at the top of the sextant is called the index mirror which is just one flat mirror. This moves around when the index arm is moved.
The sextant measures the angle between what you see through the clear side of the horizon mirror (usually the horizon) and what is reflected by the index mirror (usually the sun or another celestial body)
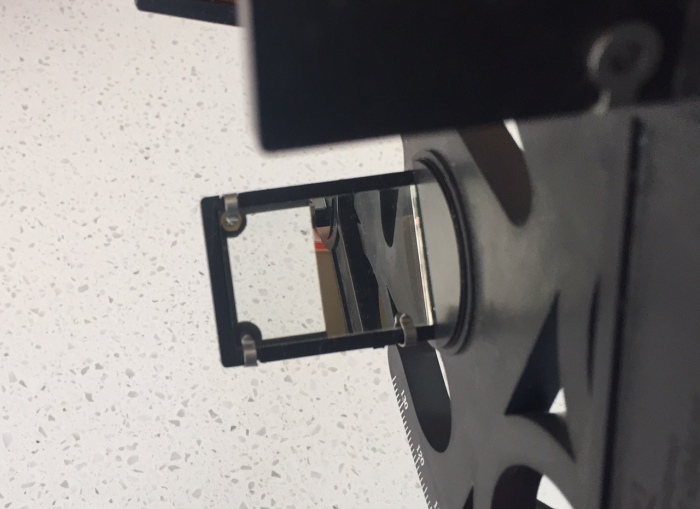 It’s quite hard to take a photo of a mirror – but here you can see the left hand side of the horizon mirror is clear and the right hand side is a mirror. You use the eye piece to look through the clear side to find the horizon and then you line up your celestial body (i.e. sun) to reflect in the right hand side.
Secondly have a look at the telescope. This is fixed in position to look directly at the horizon mirror. Ensure the telescope lenses are clean and free from dust etc.
Next check out the Index Arm. This moves backwards and forwards along the graduated arc, you squeeze together the locking device at the very bottom to move it. When you move the index arm at the bottom it also rotates the index mirror at the top of the sextant. This enables you to line up the celestial body in the horizon mirror. You make big movements by pinching together the locking device, and then you make smaller movements by turning the micrometer drum screw on the side of the locking device around.
The number lined up with the white stripe on the index arm is where you read the degrees from the arc. So in the photo below we are looking at 61º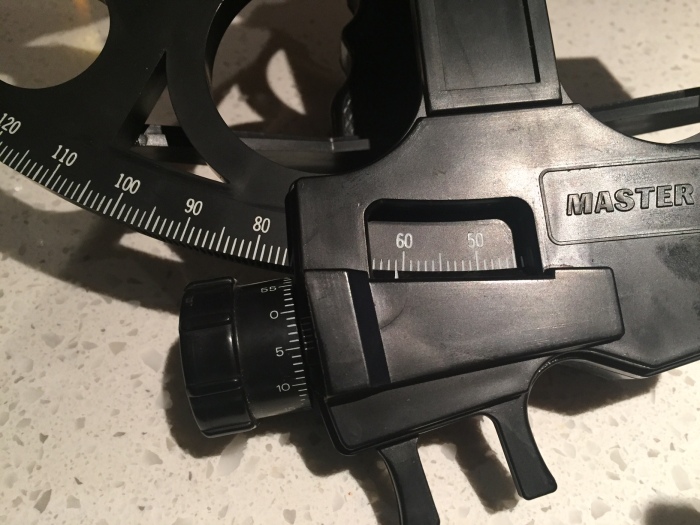
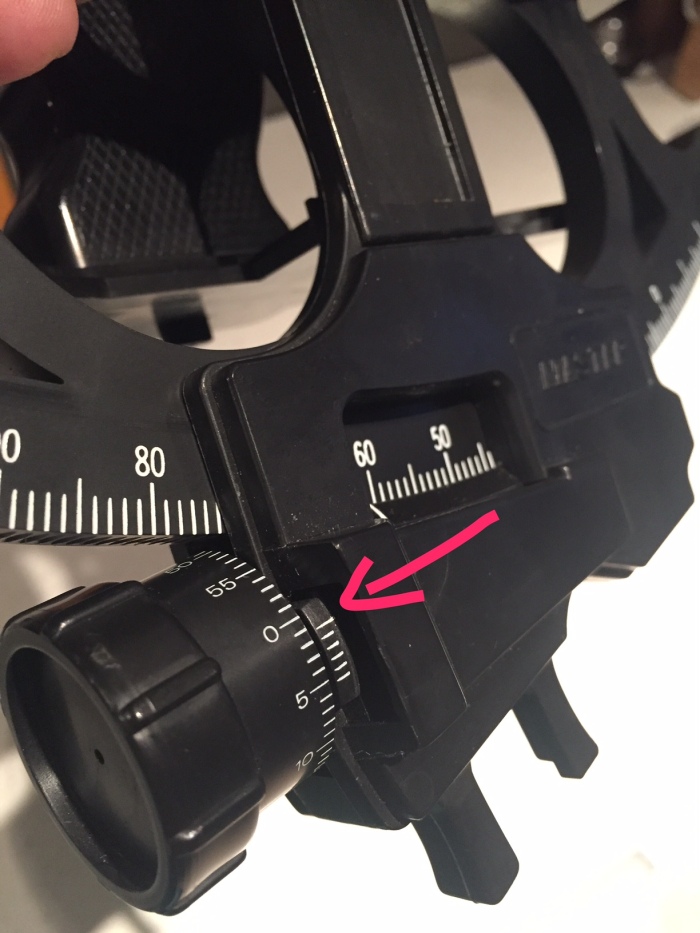
Now look at the micrometer drum. The number lined up to the longer line next to the micrometer drum screw is the minutes of a degree (the slightly longer top line in the photo below indicated by the red arrow – it is a bit hard to see that it is longer in the pic – but your sextant should have one longer line)
So in the photo below the longer line is part way between the 1 and the 2. This means that our minutes are 01′ plus some decimals of a minute.
To find out how many decimals of a minute we need to now look at the five shorter lines located below the longer one we used for the minutes. These are called the Vernier scale. These are graduations for the decimals of a minute. Each shorter line equals 2 decimals of a minute. The decimals are measured on the graduation that lines up closest to the Vernier and the drum. (OK – I found this bit a little hard to grasp.)
Have a look at the photo below. There are five shorter lines below the one longer line they each mean 2, 4, 6, 8 & 10 decimals of a minute. Which one do you think lines up best with any line next to it to form a straight line? (You ignore the longer line you used for the minutes)
I think it is the second shorter line down from the top. So that line means 0.4′
So the reading from our sextant is 61º 01.4′
Hopefully that makes sense, but if not, please comment below and I will try to do another explanation of this.
Another book I have read suggests that the decimals of a minute are probably at a level of precision that we are possibly unlikely to be able to obtain on a small boat. They suggest that you might just like to make a note of the degrees and seconds on the micrometer and not worry about the decimals on Vernier scale.
Sextant Errors
The mirrors have to be exactly straight to provide the correct reading. There is an adjustment screw on the back of each mirror that you can use to check for any errors and make the relevant adjustments. You can see the silver screws on my sextant in the top picture. The two errors are called index error and side error.
If you can’t completely eliminate the index and side errors, then we can account for that when we do our calculations. We will talk about that in a future post.
Here is a link to the Davis Sextant user guide. In here from page 4 onwards, they describe how to adjust your sextant for errors.
To check for index error we can use the sea horizon, the Sun or an horizontal line like a chimney or a tall building in the distance.
The sextant has an index error if the index mirror and horizon mirror are not parallel when the index arm and the micrometer drum with minute scale are set exactly at zero. If the error is more than +/-3,0’ we have to reduce it.
We look at the horizon with the telescope: direct horizon and the reflected horizon should be a straight line.
 index error
 no index error
We move the micrometer drum until we see a straight line: the reading on the micrometer is the index error. Make a note of this as you will need to know that number when you start working out your sextant corrections. It is called Index Correction – IC. The measurement is either on the arc – or above 0º, or off the arc – less than 0º.
Here is a short YouTube clip on how to adjust your sextant as well:
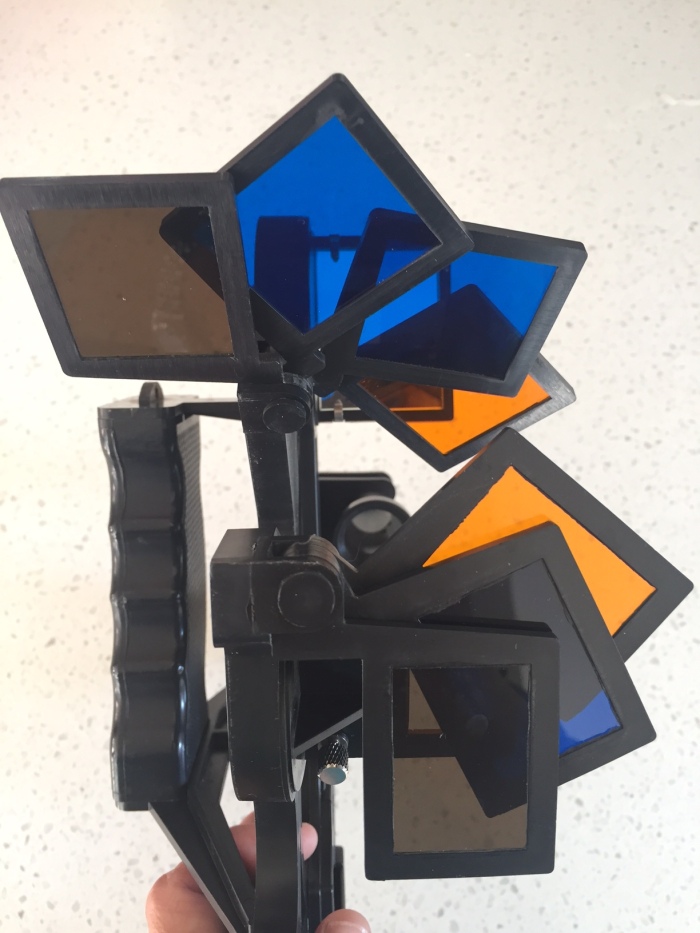
Filters
Beside each mirror you also have various different coloured filters which can flip up and down These are used to filter out the brightness of the sun so you don’t end up blinding yourself.
It is safest to put down all the filters initially and then reduce them by removing one at a time if necessary. Practise moving the filters around before you go lining up with the sun. Be very careful not to allow the sun to shine directly in to your eyes!
How to take a sight of the sun
- Carefully remove your sextant from the box, put the lanyard around your neck and hold it by the handle in your right hand.
- Check for any index error and side error. You need to check for these errors each time you use your sextant – refer to the video above on how to do this. Make a note of the index error figure.
- Put all the filters down to protect your eyes from the sun.
- Set the sextant to 0º by adjusting the index arm and micrometer screw – this means that you are effectively looking through the sextant as though it were a telescope.
- Aim the eyepiece up at the sun so you are looking directly at it (make sure you have got those filters all down!)
- Now squeeze together the two knobs on the locking device and while you keep the reflection of the sun in the mirror, slowly move the sextant down as you slide the index arm along the graduated arc until you get to the horizon.
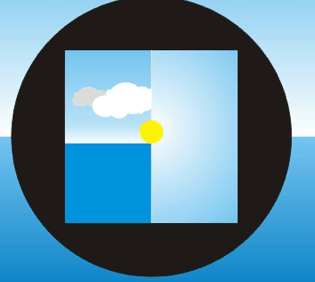
- Once you see the horizon in the left hand side of the horizon mirror, then you can make some adjustments with the micrometer screw. You preferably want to have the bottom arc of the sun sitting just on top of the horizon.
- Swing the sextant from side to side to ensure that the sun is sitting exactly on top of the horizon.
- Once you are happy with your sight look at your watch, making a note of the seconds first, then minute and hour after that. You need the exact time of your reading for what you are going to need next for working it all out.
Note that in rough conditions it can be difficult to measure the actual horizon and not just the top of a higher wave nearby. For this reason it is better to be positioned higher in the boat if possible. At least 4m above sea level is preferable (of course this can be difficult to do on a small boat!)
Try to take the sights from the same position on your boat each time. You need to make an adjustment calculation for your height of eye (called dip) at the time of the reading, so make an estimate factoring in if you are heeling over and you are sitting on the high side etc.
You might like to record up to five sights one after the other to double check your workings. Time and altitude should appear to progress steadily as you take your sights, and any anomalies can be identified.
This is good practice and your good sights can be averaged. Here is an example:
UTC – Sunday 22 August 2003
- 20h 52m 57s 41º23′
- 20h 54m 00s 41º38′
- 20h 54m 35s 41º42′
- 20h 55m 14s 41º48′
- 20h 56m 06s 41º55′
If you average the readings out, then you should get something close to your middle reading, and if not, then you might want to check again as you may have made a mistake.
The reading that you take with your sextant it called the Sextant Altitude and this is abbreviated as Hs.
The Hs figure is then corrected in a number of ways to obtain the true value of the observed object – this figure is called Ho. We will learn how to apply those corrections in a this post.
Here is another good YouTube clip for how to take a sight.
Tune in next time when we learn about Greenwich Mean Time and Universal Time – and why we need this for our calculations. You can read that post by clicking here.
In a later post we will then look at how to combine the reading we get from the Sextant, and the time that we took that reading to work out where we are!
Please comment below with any other suggestions advice or questions about Celestial Navigation so far. More blog posts to come as we work our way through so be sure to sign up to get email notifications or follow our Facebook page.
Quick Quiz
- What are the limitations of plastic sextants?
- What are the two mirrors called?
- What are the two sextant errors that you need to make manual adjustments for?
- Where do you read the degrees on the sextant?
- Where do you read the minutes on the sextant?
- How do you read the decimals of a minute on the sextant?
- Why do you swing the sextant from side to side once you have brought down the sun to the horizon?
- What should you do at exactly the same time that you take your sextant reading?
- What is the purpose of the filters?
- How should you care for your sextant?
- What is Hs?
Answers to those questions can be found in the blog post above. 🙂


Thank you for sharing! Looking forward to the next one 😄⛵️
LikeLiked by 2 people
You’ve made it sound so simple! Good job! Looking forward to more! 👏👏👏
LikeLike
Thanks Susan! That is the aim. I find myself getting a bit confused with the books I’ve read, so hopefully I can take it right back to very basic steps so we can all understand 🙂
LikeLike
The first book I read every time I revisit celestial is Mary Blewitt’s ‘Celestial Navigation for Yachtsmen’ ..it’s less than 70 small pages (including tables & index), & always helps me prime my brain for expansion 🙂
LikeLiked by 1 person
I’ll check it out. Thanks so much! 🙂
LikeLike
‘Adjusting your Sextant’ … It looked like he made both horizon & side adjustments on the horizon mirror- did I observe that correctly?
Do you know when or if you would ever have to adjust the index mirror??
LikeLiked by 1 person
Hi Kerstin, yes I saw that too. I have read that there is an adjustment that you can make to your index mirror as well.
Here is the Davis Sextant user manual – pages 4 onwards have another explanation. My index mirror does have a screw on it for adjusting it.
LikeLike
Pingback: Celestial Navigation- Measurement of Time | Astrolabe Sailing
We have a Davis Mark plastic sextant, honestly it’s not accurate enough. After you go through all the pain in getting your math correct, I expected a much better fix. We will be practicing star sights in a trip upcoming to the keys in November. I’m pushing for a real sextant…….we will see.
LikeLike
My Davis mark 25 was very frustrating as it could not hold it settings within five or more minutes due to heating and cooling of the frame. I was constantly adjusting the mirrors for every single site. I purchased a used sextant from an eBay Indian ship salvager seller, for $299 (no auctions to contend with) . It was virtually new and essentially the same as a Astra iiib. Once mirror adjustments were made, it doesn’t need readjustment. Wonderful! It took all the frustrations out of using the plastic sextant. I don’t have the heart to sell my plastic sextant on eBay because I wouldn’t want others to have to deal with that.
LikeLike
Thanks Robert. Great advice. I’ll keep an eye out for one too.
LikeLike
Pingback: Celestial Navigation – The Celestial Sphere | Astrolabe Sailing
Pingback: Celestial Navigation – Sextant Angle Corrections | Astrolabe Sailing
Pingback: Navigation – Position Lines | Astrolabe Sailing
Pingback: Celestial Navigation – Putting it all Together | Astrolabe Sailing
Pingback: Celestial Navigation – Equipment Required | Astrolabe Sailing
Pingback: Ocean Yachtmaster | Astrolabe Sailing
A few tips that may help a beginner (and perhaps others too).:
1) Practically any metal sextant, even second hand, will out-perform a plastic sextant. For practical purposes metal ones don’t wear out, though they can be damaged. Though the Davis sextants look like proper sextants, the frames and mirror brackets are nothing like rigid enough and the index error can change significantly between the beginning and the end of a series of sights. The index arm bearing is also prone to stick-slip. A beginner with a plastic sextant won’t really know whether the sextant or the observer is at fault and may thus find it difficult to improve technique.
2) When determining index error start by checking that the index mirror is perpendicular. Any textbook of navigation will tell you how and it only needs a glance. Side error comes next and _then_ index error. Changing one will effect the other, so you may have to home in on the index error, but don’t bother trying to get rid of the last two or three minutes of index error. A little side error is of no practical importance and you allow for index error in your sight reduction.
3) Look directly through the shades at the sun and adjust them for comfort before swinging the combination that suits you into place. If you put them all in place before starting you won’t be able to see the sun at all and you may even miss the horizon too if you put all the horizon shades in place.
4) At sea in a small vessel, remove the telescope and bring the sun down to the horizon with the nice wide-field view. Then, replace the telescope and sweep the horizon beneath the body to acquire it again and make the final adjustment to the micrometer. Sometimes it can be easier to hold the sextant upside down, look at the body and bring the horizon _up_ to it. Then hold it the right way up and proceed as usual.
5) A lanyard will stop you dropping the sextant overboard, but if it is too long it won’t protect the instrument from damage if you drop it. Keep the lanyard as short as practicable.
LikeLike
Awesome tips! Thanks heaps for commenting 🙂
LikeLike
Pingback: Gift Ideas for Sailors | Astrolabe Sailing