For today’s lesson in navigation we are going to look at one method of determining your position without the use of a GPS!
These are always good skills to have, because lets face it, it is super easy to become reliant on your electronic gear, but if it breaks down then you could be in trouble if you haven’t got some other skills in the toolbox to dig out of your brain and help you navigate your way to where you are going. My skills can do with a brush up. Its been a long time since I did my Coastal Skipper ticket, so here is a bit of revision. Read on and you might learn something new too.
In good weather it is possible to calculate your distance from a certain object as it appears (raises) over the horizon as you approach, or as it dips below the horizon behind you.
These objects could be lights, mountains, towers or other objects with a height above sea level detailed on the chart.

Raising & Dipping Landmarks
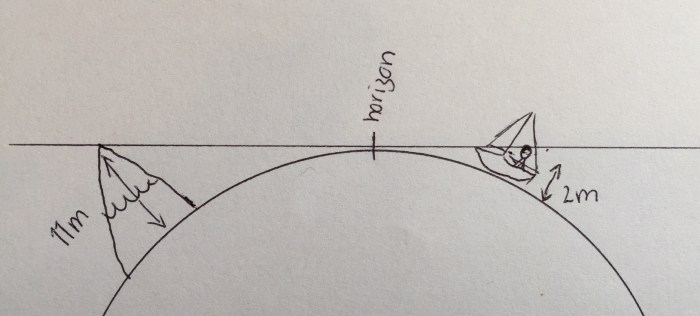
So how far away is the horizon? Well it all depends on how high up you are. If you are on a small boat, standing just a couple of metres above sea level, the distance to the horizon is going to be different to what the captain on a big ship is seeing. Thankfully some clever person has come up with a formula to work that out.
- Distance to sea horizon in miles = √height of eye of the observer x 2.03
- +
- Distance to sea horizon in miles + √elevation of the object x 2.03
Now if you are anything like me, you are beginning to wish you paid more attention in maths at school. Luckily for me, Andrew did – so here is how you enter that equation in to the calculator:
My normal calculator doesn’t actually have the √ sign. (Which is by the way, the square root for those of you who like me couldn’t remember) Thankfully my iPhone calculator does have it – if you turn the phone sideways.
Say your height of eye is 2m and the elevation of the object you want to raise is 11m.
On the calculator you go: 2 √ x 2.03 = 2.870 (so this means it is 2.870M from your height of eye to the horizon) Then take the height of the object and do the same 11 √ x 2.03 = 6.732
Then you add 2.870 + 6.732 = 9.60M
If you don’t have a calculator, thankfully all is not lost – a very considerate person has worked it all out for me already in a handy table, which you might be able to find in a nautical almanac (which is where I got mine from) 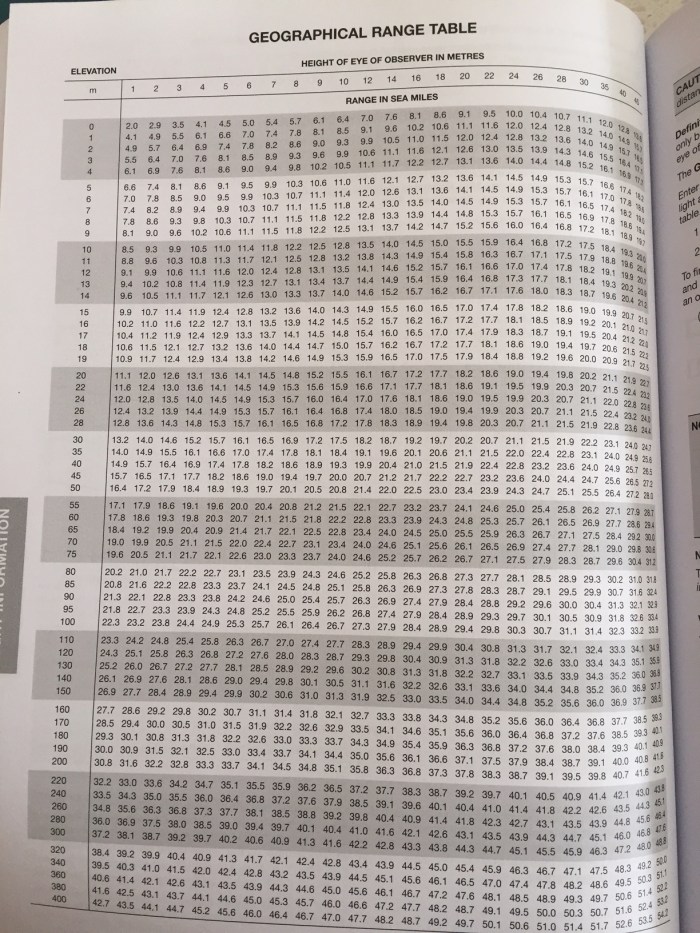
The Geographical Range is the maximum distance at which an object can theoretically be seen over the horizon.
So you can just grab this table. Work out the height of your eye above sea level – say 2m.
Next thing to do is to work out a landmark (or a light – but read on for more info on that) on your chart. For this example, lets say it is a large hill on the top of an island, like on the Isle of Pines, which is 260 metres high.
So if you look along the top of the table, and find the 2 metre column – for our height of eye, and then scroll down the column until we get to the 260 metre elevation row, then we can see that we should be able to see the top of that hill ‘raise’ above the horizon when we are 35.6 nautical miles away. (So long as it is a nice clear day)
So then you get your compass (the one you draw circles with), measure off on the side of the chart 35.6 miles – put the pin on the top of the mountain and draw an arc on the chart. This gives you your first position line – i.e. you are somewhere on that line. When you do see it raise above the horizon, you can take a bearing with your hand bearing compass, or compass binoculars. Now you have got a bearing to the light, which you can draw on your chart as well. All going well your vessel should be where the two lines intercept. You could also check the chart for the depth of the water, and compare that with what your depth sounder says for further clarification of your position. 
So there are a few things to take in to account when it comes to using this table.
- Height of tide. If you want to get really clever then you can take the tide heights in to account, however this is generally ignored in this calculation
- The table includes an allowance for atmospheric refraction (which is the bending of light rays as they pass through the atmosphere) Abnormal refraction may occur in unusual conditions of pressure, temperature and humidity. This can increase or decrease the range.
- You need to have good visibility to do this – as its quite difficult to raise or dip anything if you are surrounded in fog or if it is dark… 😉
Usually the weather forecast will give you an idea on the visibility range.
Very Poor Visibility less than 1/4 mile
Poor Visibility between 1/4 mile and 2 nautical miles
Moderate Visibility between 2 and 5 nautical miles
Good Visibility more than 5 nautical miles
Raising and Dipping Lights
The good news is, that if it is dark, then you can use the same calculations to raise or dip a light house. However – the light’s intensity (its luminous range) needs to be greater than its geographical range. So the maximum range at which a light can be seen is either its geographical range or its luminous range – whichever is LESS.
To figure this out, you need to get another table and calculate both the geographical range and luminous range and compare the two.
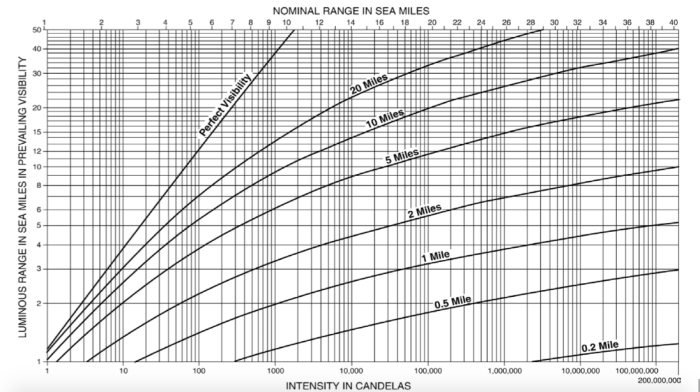
The diagonal lines on the chart relate to the meteorological visibility at the time of the observation. On some of our marine forecasts on the VHF the prevailing visibility is usually given. Of course it is dark, it can be hard to tell what the visibility is like, but anyway you get the gist. Lets pretend it is 20 miles for our exercise.
From the chart, obtain the light’s nominal range. The nominal range of a light is the range at which a light can be seen when the actual/meterological visibility is 10 miles. It is also the figure that is listed on the chart.
I will use Cape Campbell light in my example, as this is a light that I have spent many hours watching on my travels up and down the coast.
Its light characteristics are: Fl W 15s 47m 19M
So it is a flashing white light with a period of 15 seconds 41 metres high and 19 miles visibility (in 10 miles nominal range)
Using the geographical table above. If I am 2 metres above the water and the light is 47 metres high, then its geographical range is 11.7 miles.
Using the luminous range table above. If the light has a nominal range of 19 miles (the top of the table), and we have got 20 miles visibility (on the curved line) then we should be able to see this light from 30 miles away (on the left hand side of the table).
Therefore the luminous range is greater than the geographical range, so we should be able to ‘raise’ this light above the horizon to give ourselves a position line.
Things to consider:
- The meteorological visibility is hard to estimate accurately. It might be clear where you are but the light might be covered in cloud. The luminous range should just be considered approximate.
- The loom of a light may appear as a glow on the horizon before the light itself actually appears. So you must wait until the light itself is seen for your calculation.
- If the lights luminous range is less than the geographical range then it will gradually become visible as you approach – you cannot use this as a way of fixing your position with any degree of accuracy. You can use it for taking a bearing, but you will not get your distance off.
Hey you guys are getting good at this! Want to try some examples for you to work out on your own?
- The light has a charted elevation of 55 metres and a nominal range of 14 miles. The meteorological visibility is 20 nautical miles and your height of eye is 6 metres above sea level. Will the light be seen to dip as the boat moves away, and if so what is the range of the light when it dips?
- The light has a charted elevation of 14 metres and a nominal range of 10 nautical miles. The visibility is 10 nautical miles and the height of eye is 6 metres above sea level. Will the light raise as you approach and at what range?
Answers below the photo!
- The geographical range is 20 miles and the luminous range is 22.5 miles – The luminous range exceeds the geographical range and therefore the light should be seen to dip at 20 miles.
- The light’s geographical range is 12.6 miles, but the luminous range is 10 miles. Therefore the light isn’t bright enough or the visibility isn’t clear enough to allow the light to be seen as it raises.
Here ends todays lesson. I certainly refreshed my knowledge. You can read more about this and get copies of the tables above on the LINZ website.
I am currently studying for my Ocean Yachtmaster exam and so need to refresh my Coastal Skipper course skills again.
Let me know if you have any other tips to add in the comments below.


Pingback: Measuring Distance Off a Landmark | Astrolabe Sailing
Pingback: Basic Navigation | Astrolabe Sailing
Pingback: Coastal Skipper | Astrolabe Sailing
Pingback: Navigation – Position Lines | Astrolabe Sailing
for the education of Sheffield esteemed Forum.
LikeLike
Pingback: NAVIGATION PRINCIPLE – Diary of a Seaferer
Thank you for sharing your wisdom about the topic in raising and dipping lighthouse and landmarks. It is helpful in my review for upcoming examination next month.
Sir, you tailored it in such detailed that even the cadets would understand.
Good luck to your journey at sea and in life.
LikeLiked by 1 person
Thank you! Glad you enjoyed and good luck with your exam. Cheers Viki 🙂
LikeLike
Pingback: RYA Offshore Yachtmaster | Astrolabe Sailing