Apologies for the delay between posts, I have had my boat in the haul out yard over the weekend and that has occupied all my study time!
So to summarize where are are at so far in regards to our celestial navigation studies. We have covered off:
Today we are going to have a look at the measurement figure we got from the sextant and the corrections that need to be made to that figure before we can start working out our position.
A Sight Reduction Form comes in very handy when it comes to working out your sights. The whole form is a bit scary to look at all at once, so I am going to break it down in to manageable bites. Here is the first part and covers just the corrections we are going to talk about today.
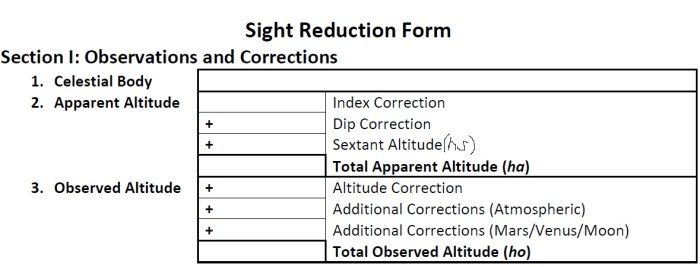
You can see that in 1. You write in the celestial body you are measuring – so in our case we are going to use the sun. Then write the angle you took with your sextant (hs) in the forth box down – Sextant Altitude.
Now read on to find out how to work out the rest!
The adjustments should be made in the following order.
Instrument Correction
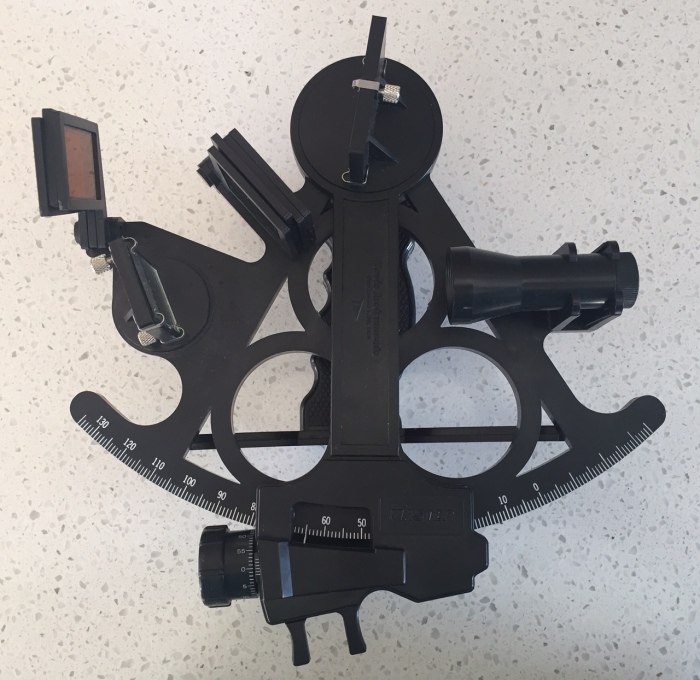
When sextants are being made there could be some imprecise machining of the arc which can cause a permanent error in what the sextant reads. These corrections are established by the manufacturer and are noted in the certificate of accuracy which can usually be found inside the lid of the sextant box (mine doesn’t have one) You can disregard any corrections smaller than 0.3′ of arc. Your sextant could possibly be certified as having “no significant error” and in which case you don’t even need to worry about this correction at all! There isn’t a specific box for Instrument Correction in the table above, but you can combine it with your Index Correction.
Index Correction IC
Remember when we were checking the sextant for any errors back in the first post? If you were unable to remove the errors by adjusting the screws on the back of the sextant mirrors, then you can instead use a mathematical calculation using the number you noted down as being your Index Correction.
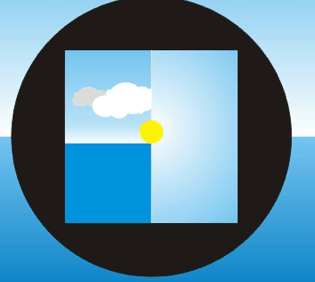
If the error is ‘on the arc’ – if it is greater than 0º then you need to subtract the error. If it is ‘off the arc’ – if it is on one of the blank lines to the right of the 0º in the picture above – then you add the error.
You can remember it by saying “If it is on, take it off, and if it is off then add it on!”
Put this figure in the Index Correction box on the table above.
Dip – D or dip – Height of Eye Correction
If you are taking your sextant readings from the bridge of a big ship then you are going to get a different sextant reading to if you were on a small yacht. Therefore we need to make a correction to what your sextant says to get your reading converted to a sea level reading. This is called Dip or an adjustment for your height of eye.
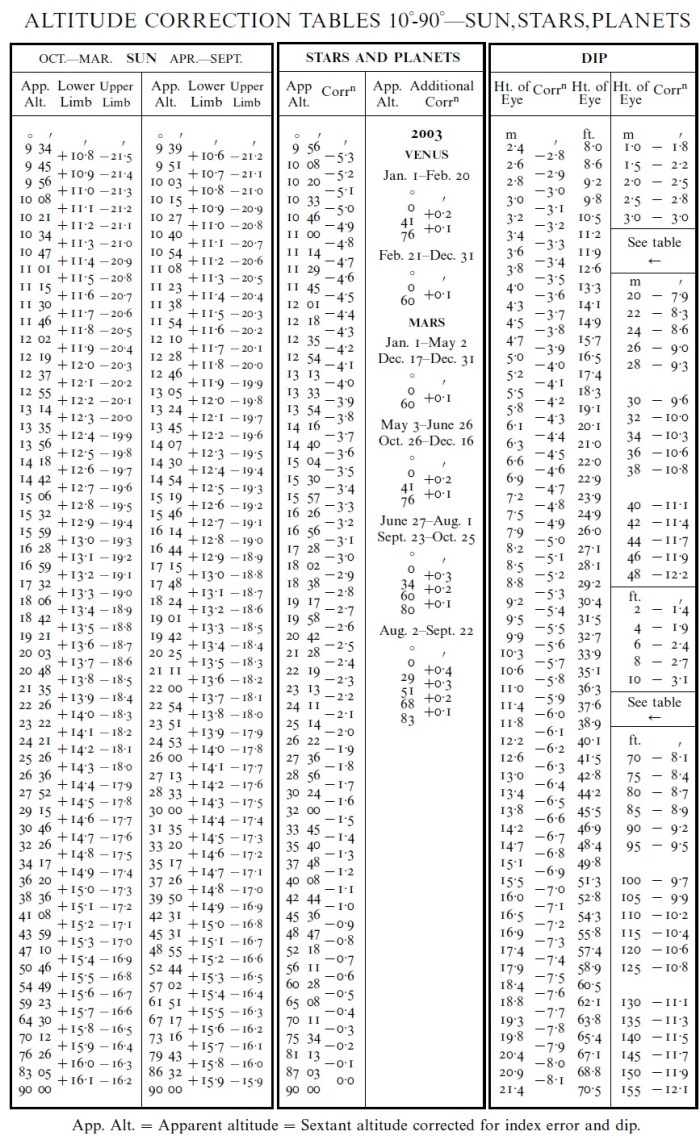
Take a look at the table below. On the right hand side is a column called Dip. I imagine that if you are standing up on the side of a small yacht when taking your sextant reading, you are likely to be about 3 metres above sea level.
If you look down the table until you get to 3.0m and then look across to the number beside it you will see 3.1′. This is our Dip figure and it is always subtracted from the sextant reading.
Put the Dip Correction in to the table above and combine with the Index Correction and Sextant altitude to get ha – or total apparent altitude
You can learn more about the Dip Correction and how to account for wave heights in this video:
You might note that the table below only covers angles from between 10º-90º. There is another table for between 0-10º but it is preferable to have an angle of greater than 10º to get a better level of accuracy.
If the number you get is exactly the same as the value on the table – then use the correction figure on the line above.
Total, Third or Combined Correction
Do you remember in the first post when we talked about getting the bottom of the sun just touching the horizon in our sextant mirror? This is called the lower limb of the sun. You can also take a measurement of the top limb of the sun (for example if the bottom of it was covered in cloud) or a star.
What we really want to know is the angle between the horizon and the middle of the sun, but of course that is pretty hard to estimate, so we have to do a bit more maths to figure out the distance between either the top or bottom limb of the sun and it’s centre. The other correction included in this figure is refraction – or distortion of the angle of the sun as it comes through the atmosphere. It is all conveniently worked out for you in the tables.
So in the left hand column on the table above which says SUN. You will note that there are two columns depending on the month of the year. So say we are in October and we measured the lower limb of the sun at an angle of 18º. If you look down the column until you get to 18º you can see that the correction is +13.3′.
If we were measuring the upper limb of the sun in October then we would make a correction of -19.0′.
Put the figure in to the altitude correction box of your Sight Reduction form.
Make a copy of the table above and put it in your navigation folder. You can use this for all your equations as you move on.
This short video shows you how do to this as well.
Quiz
OK let’s check what we have learned here – and please feel free to comment if you think I have made any mistakes!
- The month is July. You have an Index Correction of 2.3′ on the arc. Your height of eye is 5m. You measure the lower limb of the sun at 20º 30.5′
I have typed it out as if I was completing the boxes above. Use the table provided to work out the dip and altitude correction. Cover up the bit below until you have worked it out yourself.
I get:
- Sun lower limb
- IC = -2.3′ (if it’s on then take it off)
- Dip = -4.0′ (we always subtract dip)
- hs = 20º 30.5′ (hs = what we read on the sextant)
- ha = 20º 24.2′ (all the above combined together)
- Altitude Correction = +13.4′ (as per the table relating to our ha figure)
- No other corrections for atmosphere or planets
- ho = 20º 37.6′ (ha plus the altitude correction)
Do you agree?
2. The month is October. We have an Index correction of 3.0′ off the arc. Your height of eye is 10m (we are on a flash launch) You measure the upper limb of the sun at 17º 15.8′
I get:
- Sun upper limb
- IC +3.0′ (if it is off add it on)
- Dip = -5.6′ (we always subtract dip)
- hs = 17º 15.8′ (as per what we read on the sextant)
- ha = 17º 13.2′ (hs – dip + IC)
- Altitude Correction = -19.1′ (as per the table using the ha figure)
- No other corrections for atmosphere or planets
- ho = 16º 54.1′
Remember there are only 60′ in each degree. So hopefully I have worked that out correctly. If you are better at maths than I am please comment to let me know!
3. The month is August. We have an index correction of 2.1′ on the arc. Your height of eye is 4.5m, you measure the lower limb of the sun at 43º 50.5′
I get:
- Sun lower limb
- IC = -2.1′ (if it’s on then take it off)
- Dip = -3.8′ (we always subtract dip)
- hs = 43º 50.5′ (as per the reading from the sextant)
- ha = 43º 44.6′ (combining all the figures above)
- Altitude Correction = +15.0′ (as per the table using the ha figure above)
- No other corrections for atmosphere or planets
- ho = 43º 59.6′
4. The month is November, we have an index correction of 2.7′ off the arc, your height of eye is 2.9m, you measure the lower limb of the sun at 21º 19.3′
I get:
- Sun lower limb
- IC = +2.7′ (if it’s off add it on)
- Dip = -3′ (found on the table – we always subtract dip)
- hs = 21º 19.3′ (as per the reading from the sextant)
- ha = 21º 19.0′ (combining all the figures above)
- Altitude correction = +13.8′
- No other corrections for atmosphere or planets
- ho = 21º 32.8′
5. The month is December, we have an index correction of 1.9′ off the arc, your height of eye is 1.7m, you measure the lower limb of the sun at 63º 59.3′
I get:
- Sun lower limb
- IC= +1.9′ (if it’s off add it on)
- Dip = -2.3′ (from the table above – we always subtract dip)
- hs = 63º 59.3′ (as per the reading from the sextant)
- ha = 63º 58.9′ (combining all the figures above)
- Altitude correction = +15.7′
- No other corrections for atmosphere or planets
- ho = 64º 14.6′
If you fancy making up any more examples to work out in the comments below, please do! I could do with all the practise I can get. 🙂
Check out the Vanderbilt University online Celestial Navigation Course for more learning. I have used their brilliant video clips in the post above.


Pingback: Celestial Navigation – Putting it all Together | Astrolabe Sailing
Pingback: Celestial Navigation – Equipment Required | Astrolabe Sailing
Pingback: Ocean Yachtmaster | Astrolabe Sailing
Pingback: Celestial Navigation – The Moon | Astrolabe Sailing
Pingback: Basic Of Celestial Navigation – My Sea knowledge by: 3/0 John Anthony Dana
If you take your sight atop a ‘typical’ wave, why add half the wave height? Surely, the observed horizon is the locus of tops of distant waves and no addition to HoE is necessary. Indeed, if atop a ‘small’ wave, a theoretical (but impractical) HoE reduction applies.
LikeLiked by 1 person
Hmmm good point. I’m not sure about that. Would need to do some more study
LikeLike