We have been jumping around topics a bit, so I thought it might be best to put together a bit of a summary of what we have learned so far, what we still have to cover and how it is all eventually going to come together.
It has certainly been useful for me to break everything down in to bite sized pieces and for those who are still following along, or are planning on doing some celestial navigation study in the future, hopefully this post might be a good summary of how it all works.
Step 1. Introduction
First of all it helps to get an idea of the general concept of celestial navigation, and the terminology used. There are far more complicated mathematical explanations of how it all works, but my post is a simplified version that hopefully will make sense to you.
Click here to read all about the celestial sphere.
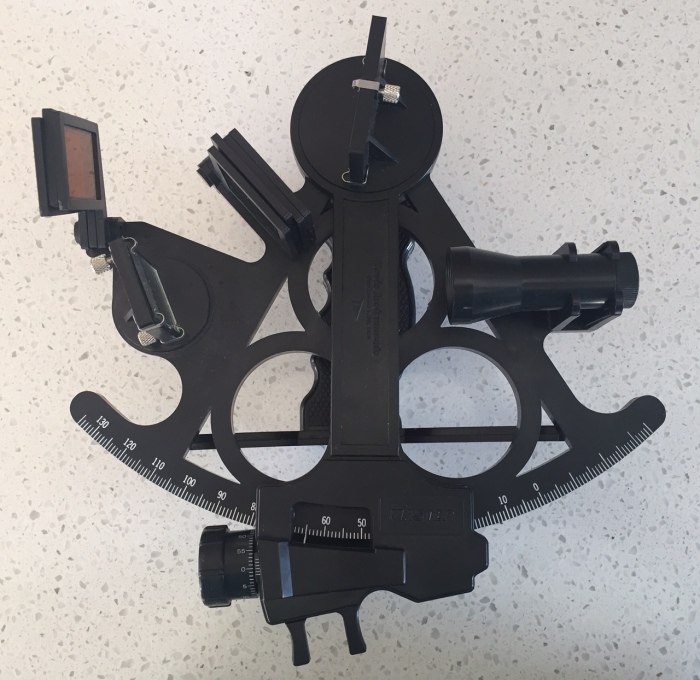
Step 2. Equipment Required
There are a few bits and pieces required for Celestial Navigation. Having a sextant is a good start, but you will also need some sheets to work it all out and some tables with all the calculations done for you. This post has got a list of all the things you need and links to the pages you can print out.
Click here to gather together all the equipment, worksheets and tables you will need.

Step 3. – Where are We?
We have to have a reasonable idea of where we are to start off with. The fix we get is merely confirming our position. We do this by Dead Reckoning – which is taking the course and speed we are sailing through the water, and then plotting that on to the chart to give ourselves an estimated position.
Click here to read the post about Dead Reckoning and plotting a course.

Step 4. – What Time is It?
We need to know the exact time that we take the sight to work out exactly where the sun’s ground position is at that particular time. The time we need is UTC date and time.
Click here to read the post about time
Step 5. – Taking the Sight with the Sextant
Before you take the sight you need to check your sextant for any errors, and then take a note of the sight and the UTC time you took it.
Click here to read all about taking the sight with your sextant.
Step 6. – Accounting for Sextant Errors
Now we can start to work it all out. We need to make a couple of adjustments to our reading to account for our height of eye above the water and to adjust the reading to be for the middle of the sun.
Click here to read how to use the Altitude Correction Tables.
Step 7. – Where is the Sun?
We explain our position on the globe in Latitude and Longitude. The point on the earth directly below the sun is the ground position, and this is explained in GHA and Declination. Some very clever person has worked out exactly where this spot is on the earth at any given time throughout the year and put that position in to tables.
Click here to learn how to read the Sun Almanac tables.
Step 8. Our Position in Relation to the Sun
We now need to work out where we are in relation to the sun. i.e. The angle between our DR Location (refer step 3) and the sun’s GHA. This is called Local Hour Angle or LHA.
We need to adjust our Dead Reckoning DR position to an Assumed Position AP. Basically a position that will give us a nice round number for when we go to use the Sight Reduction Tables.
Click here to learn how to work out the LHA.

Step 9. – Azimuth and the Sight Reduction Tables
With the information you have gathered so far – your assumed latitude, the LHA – or angle between your position and the sun’s ground position, and the declination of the sun, then you can look up the Sight Reduction tables. These tables tell you the Azimuth angle or bearing of the sun from your position, and what the computed altitude of the sun should be from that position.
Click here to learn how this all works.
Step 10. – Plotting your position
Once you have your assumed position and the bearing of the sun from your boat’s position, you can draw a line pointing towards the sun. Then you compare the difference between the corrected angle you measured on your sextant, with the one from the Sight Reduction tables. The difference in minutes equates to the distance in nautical miles either closer to or further away from the sun you are from your assumed position. Finally now you can draw your position line!
More to come:
Noon Sights Working out your Latitude
Using the Stars for Sights


Hi Viki!
I just want to thank you for all yourhard work in putting this all together. I’ll be starting my “real” sailing classes soon and I want to take them all, including Celestial Navigation. I’ve been reading all your posts and have saved every one in a folder for future reference. I know they will help me very much. Thanks again and I hope I get to meet you someday in person
Diane
LikeLiked by 1 person
Thanks Diane! Good luck with your sailing classes. I am so pleased you are enjoying the posts. 🙂
LikeLike
Pingback: Celestial Navigation – Equipment Required | Astrolabe Sailing
Thanks so much for collecting this all in one place! I’ve bookmarked it for when I start my course
LikeLike
Awesome! I look forward to hearing how you get on too 🙂
LikeLike
Pingback: Celestial Navigation – Plotting Your Position | Astrolabe Sailing
Pingback: Gift Ideas for Sailors | Astrolabe Sailing
Pingback: Celestial Navigation – The Moon | Astrolabe Sailing
Pingback: Awesome Apps for Sailors | Astrolabe Sailing
Pingback: The Ultimate Boating Spreadsheet | Astrolabe Sailing
Pingback: Basic Navigation | Astrolabe Sailing
Pingback: A Voyage of Discovery | Astrolabe Sailing
Pingback: NAVIGATION PRINCIPLE – Diary of a Seaferer