We take a short side track from our Celestial Navigation posts to do some quick revision on position lines and plotting positions on the chart.
To work out our position by using a sextant sight, we first need to have an estimated position. This is worked out by using Dead Reckoning – or an educated guess at where you actually are. You can learn more about that below.
If you are a bit rusty on your navigation skills, then check out this blog post on basic navigation to refresh your memory on some of the basic terminology before moving on.
I must admit I have learned so much throughout this course. This makes me LOVE my GPS even more! Anyway fingers crossed the GPS never breaks down, but if it does – read on and you will know what to do with your paper charts!
Plotting a Course
I must admit that my paper chart plotting skills have been neglected since the download of the amazing Navionics app. I am a whiz at plotting courses on there! But the whole idea with celestial navigation and all these other skills is something to fall back on should you get struck by lightening, lose power, or your GPS doesn’t otherwise work as it should. So it is worth dusting off the cobwebs again.
Here are a few key things to remember:
- The direction in which you are steering the boat or the intended heading is called the boat’s ‘course‘ and is indicated by an arrow pointing in the direction you are heading.
- Water Track – is the path the boat takes through the water
- A ‘bearing‘ is the direction of an object from the boat
- Set is the direction towards which a current or tidal stream is flowing and is indicated by three arrows in the direction of the set
- Drift is the distance the boat travels due solely to water movement
- Rate is the speed of water movement expressed in knots
- Leeway – the angular distance between the water track and the true heading due solely to the effect of the wind
Remember when you are plotting anything on the chart you need to plot the true course – not the compass course.
First of all plot your present position on the chart (in pencil) then draw a line of the course on which you intend to travel along to your destination. Firstly you should thoroughly check the track, you should ensure that there are no hazards along the way, rocks, and sufficient depth are two key things to check for.
This is line represents the boat’s ground track or ‘course made good‘. The symbol for this track is two arrow heads pointing in the direction of the intended travel. You can now put your parallel rules on this line and then move it over to the compass rose on the chart (while maintaining a parallel line). This will give you your true course and once you have converted it to a compass course, then you know what way to steer. You can write this course on your chart.

Position Lines
A position line or Line of Position – LOP is a line that is plotted on the chart on which the boat position lies. It might also be a circle so it could then be called a position circle. It is used to confirm your position on the chart. You need two or three lines intersecting to get a confirmed fix.
There are various different ways of obtaining position lines and position circles. These include:
- Raising and dipping lights & landmarks
- Vertical sextant angles – from landmarks
- Horizontal sextant angles – from landmarks
- Compass bearings, relative bearings, radar bearings
- Transit bearings
- Radar Range
- Leading lights
- Light sectors
- Depth contours
- Celestial navigation
If you only have one single position line obtained by one of the methods above, then you can ascertain that your boat lies somewhere on that line. It cannot be fixed until you cross that line with one or more other lines at the same time.
Single position lines can still be useful though as you can use them as advanced lines of position. Particularly when doing celestial navigation.
Dead Reckoning
Dead Reckoning – DR means determining your current position by projecting your course over the ground and speed from a known previous position. The DR position is an estimate only as it doesn’t take in to account any current, leeway and other errors.
Before the days of GPS, this is how navigators worked their way around the world, taking every opportunity to obtain a sight to confirm their position.
To plot a Dead Reckoning position on the chart, you convert your course to true, use the compass rose on the chart to determine your course, and a parallel ruler to move that course to the appropriate place on the chart, starting your line at your last confirmed position and projected forwards. Then you measure the distance travelled off the latitude scale on the side of your chart – 1 minute of latitude = 1 nautical mile. Above the line you should write C (for course) and the degrees in true, and below the line put an S (for speed) and the speed in knots.
If you have a confirmed position fix you should circle it and put the time beside it written horizontally. A DR position should be marked with a semi-circle and the time written vertically.
You should plot your DR position every hour on the hour, after every change of course, after every fix and after plotting a single line of position. If you obtain a fix and the position is different to your DR position, you should start a new line from that fixed position and then continue. Draw your line on the chart with a C for course and the true course above the line, below the line put a S with the speed you are travelling.
The longer you go without a confirmed fixed position – the less accurate the DR position will be. Fix expansion is a method of taking in to account all the possible errors from the DR position such as steering errors, compass errors, leeway, wind, currents etc and plot them on to an expanding error circle, which you would inspect for any hazards as you could potentially be anywhere inside that circle.
An Estimated Position – EP is a DR position corrected for the effects of steering error, current and leeway. Estimated Positions – EP’s should be identified by a square and the time. The time should be written in zone time or UTC – but obviously use the same time throughout!
Tidal Current is the horizontal movement of the sea surface caused by the tide – or gravitational forces of the sun and moon. Current is the horizontal movement of the sea surface caused by weather, topographical and oceanographic effects. Set is the direction in which the current is travelling and drift is the speed of that current measured as a rate in knots. Leeway mostly applies to sailing vessels and refers to the leeward motion of a boat caused by the wind. You can correct your DR position by applying these effects to get an Estimated Position – EP.
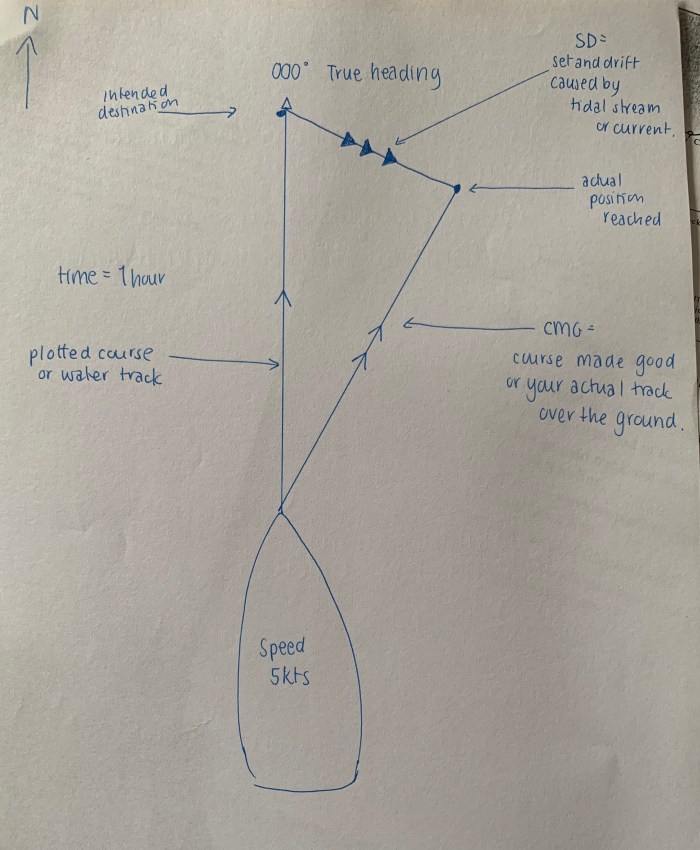
The plotted course is the distance and direction travelled through the water – use one arrow on the line. The Course Made Good is the direction and distance travelled over the ground – use two arrows on that line. The set and drift is the direction and speed of the tide or current – use three arrows on this line. The three vectors form a triangle.
An Assumed Position – AP is a round number close to our DR position that we use when working out our position with celestial navigation. The Sight Reduction Tables only use round numbers.
Advanced Lines of Position
Whether it is the sun or another landmark, each sight gives you a position line LOP for the boat. As mentioned above, in order to confirm your position you need a second line – confirming that you are at the point where the two lines cross. However if this is not possible then you can take sights of the sun a few hours apart.
For example you could take a sight of the sun in the morning, at noon and again in the afternoon. To establish your position, you need to advance your first line by the distance traveled between the first line and the second line. The length of the line is the distance traveled by the boat – i.e boat speed in knots x time between sights.


Sorry for the recent silence – been meaning to comment for a while about how much I’m enjoying your celestial nav posts! Enjoyed this post, too – we did a lot of dead reckoning aboard Celeste before we got GPS – it’s so easy not to do it now, but I really ought to make the effort – it’s so much fun, really – so much more interesting!
LikeLike
Thanks Ellen! Glad you are enjoying. I think it’s slowly starting to sink in for me.
It’s far too easy to be reliant on the GPS now isn’t it. I am going to make more of an effort now that I’ve studied all this stuff up again to make sure it sticks! 🙂
LikeLiked by 1 person
Pingback: Celestial Navigation – Local Hour Angle | Astrolabe Sailing
Pingback: Celestial Navigation – Putting it all Together | Astrolabe Sailing
Pingback: Ocean Yachtmaster | Astrolabe Sailing
Pingback: Celestial Navigation – Azimuth & Sight Reduction Tables | Astrolabe Sailing
Pingback: Celestial Navigation – Plotting Your Position | Astrolabe Sailing
Pingback: Celestial Navigation – The Celestial Sphere | Astrolabe Sailing
Pingback: Basic Navigation | Astrolabe Sailing
Pingback: NAVIGATION PRINCIPLE – Diary of a Seaferer
Pingback: RYA Offshore Yachtmaster | Astrolabe Sailing